
Web if you have a label or heading on a spreadsheet in excel that you want to center across a certain number of cells, there are couple of ways you can do this, with or without merging cells. Both of these forms will easily center the text in a cell if the below steps are followed properly. Web how to center a worksheet horizontally and vertically in excel. This tab contains all the formatting and alignment options you need to customize your worksheet. Choose the margins tab at the top of the window.
This method is similar to the previous method, but using the keyboard shortcut ctrl + p instead of file > print in menu options. Web ctrl + p > page setup > margins. Using the print preview option to make a worksheet horizontally at the center. Find center on page at the bottom.
Web ctrl + p > page setup > margins. To do this, select the cells you want to merge. This method is similar to the previous method, but using the keyboard shortcut ctrl + p instead of file > print in menu options.
How to Center The Page Horizontally in Excel A StepbyStep Guide

In this article, we discuss how to center a worksheet in excel and provide multiple methods so that you can choose the. Within the home tab, locate the alignment group. Centering the worksheet horizontally using.
How to Center Worksheet Horizontally and Vertically in Excel?

Manually setting margins on the page. This is particularly useful when you have headings or labels in your spreadsheet that you want to stand out. Using the print preview option to make a worksheet horizontally.
Center Headings Without Merging Cells in Excel YouTube

Center a worksheet horizontally using print preview. Web no more, no less. Web there are multiple methods for centering your worksheet, including using the page setup tool and custom margins. Click on the file tab.
How to Center Worksheet in Excel Center Sheets Vertically or
Web keyboard shortcut lovers can use ‘alt + h’ followed by ‘a’ and then ‘c’ to center text horizontally. Center a worksheet horizontally using print preview. Manually setting margins on the page. This action will.
How To Center Worksheet Horizontally Excel

Center a worksheet horizontally from page setup. Print preview and print button > page setup > margins. Web we will guide you on 3 easy ways to center a worksheet horizontally and vertically in excel..
Center Worksheet Horizontally And Vertically In Excel

Web learn exactly how to center a worksheet horizontally in excel in this lesson. Web centering your worksheet horizontally will align your data in the middle of the printed page, making it look more organized.
How to Center Worksheet in Excel Center Sheets Vertically or

To start, download this attached excel workbook you can practice on. Web there is an easy way to center the data on the printed page. Web if you have a label or heading on a.
Web to center the worksheet horizontally and vertically on the page, in the ribbon, go to page layout > margins > custom margins. It’s perfect for when you’re printing out reports or presentation materials. Click on the ‘page layout’ tab in the excel ribbon. In this method, you will use a dialog box launcher tool. To see how your worksheet will display when printed, click on file and then print.
As a consequence, you cannot store more than 1,048,576 rows in a worksheet. This method is similar to the previous method, but using the keyboard shortcut ctrl + p instead of file > print in menu options. Click the page layout tab.
Understanding How To Center An Excel Worksheet Can Make It Easier To Print Your Documents.
To see how your worksheet will display when printed, click on file and then print. Within the home tab, locate the alignment group. Web centering your worksheet horizontally will align your data in the middle of the printed page, making it look more organized and professional. Web keyboard shortcut lovers can use ‘alt + h’ followed by ‘a’ and then ‘c’ to center text horizontally.
Web Here’s How To Do It:
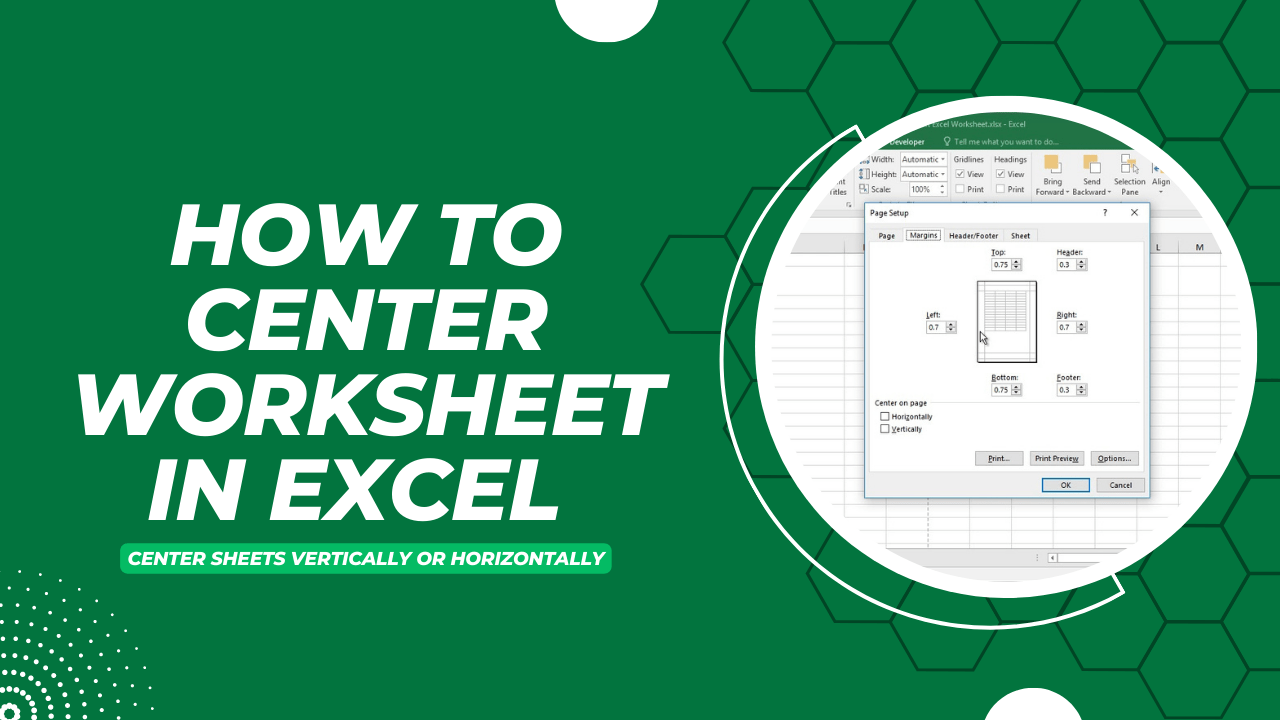
Quick tips to center your excel spreadsheet horizontally include adjusting margins, scaling options, and print preview. To see the final result, in the ribbon, go to file > print (or use the ctrl + p shortcut). All 3 methods require the page’s margins settings which we will access with the page setup launcher tool, the toolbar ribbon, and print preview. Go to the page layout tab, click on the small arrow in the corner of the page setup group, and in the page setup dialog box, under the margins tab, check both the horizontally and vertically options under center on page.
You Can Center The Data Horizontally, Vertically, Or Both.
It’s perfect for when you’re printing out reports or presentation materials. To center your worksheet horizontally, select the entire worksheet or the specific rows/columns you want to center, navigate to the page layout tab in the ribbon, and choose the ‘center’ option from the ‘alignments’ group. To vertically align text, pick top align , middle align , or bottom align. Web ctrl + p > page setup > margins.
Remember That Centering Data Horizontally Will Not Affect The Cell’s Content Formatting, Such As Font Size Or Color.
Web if you have a label or heading on a spreadsheet in excel that you want to center across a certain number of cells, there are couple of ways you can do this, with or without merging cells. Web learn exactly how to center a worksheet horizontally in excel in this lesson. We’ll show you both ways. Center the worksheet horizontally from the print menu.
One is using the center content option and the other is applying the format option. You can also use the keyboard shortcut “ctrl + e” to quickly center text. First, we’ll center text across cells by merging cells. This method is similar to the previous method, but using the keyboard shortcut ctrl + p instead of file > print in menu options. Center a worksheet horizontally from page setup.